
Yield คอนโดคืออะไร ? ควรได้กี่เปอร์เซ็นต์ถึงจะเป็นการลงทุนที่ดี
Yield คอนโดคืออะไร สำคัญต่อการลงทุนปล่อยเช่าอย่างไร พร้อมเกณฑ์ Yield ที่ดีควรอยู่ที่กี่เปอร์เซ็นต์ และวิธีคำนวณแบบเข้าใจง่าย สำหรับนักลงทุนมือใหม่
โพสต์เมื่อ16 June 2026

Creating Tags is a technique used to group multiple listings together, allowing you to manage, refresh, activate, deactivate, and perform other actions on several listings simultaneously. This method helps you work more efficiently and can be used completely free of charge, with no additional fees or service costs.
Before you begin tagging your listings, you must first create a set of tags. This can be done by clicking the “Create and Manage Tags” button located in:
Dashboard >> Listings Menu >> Create and Manage Tags
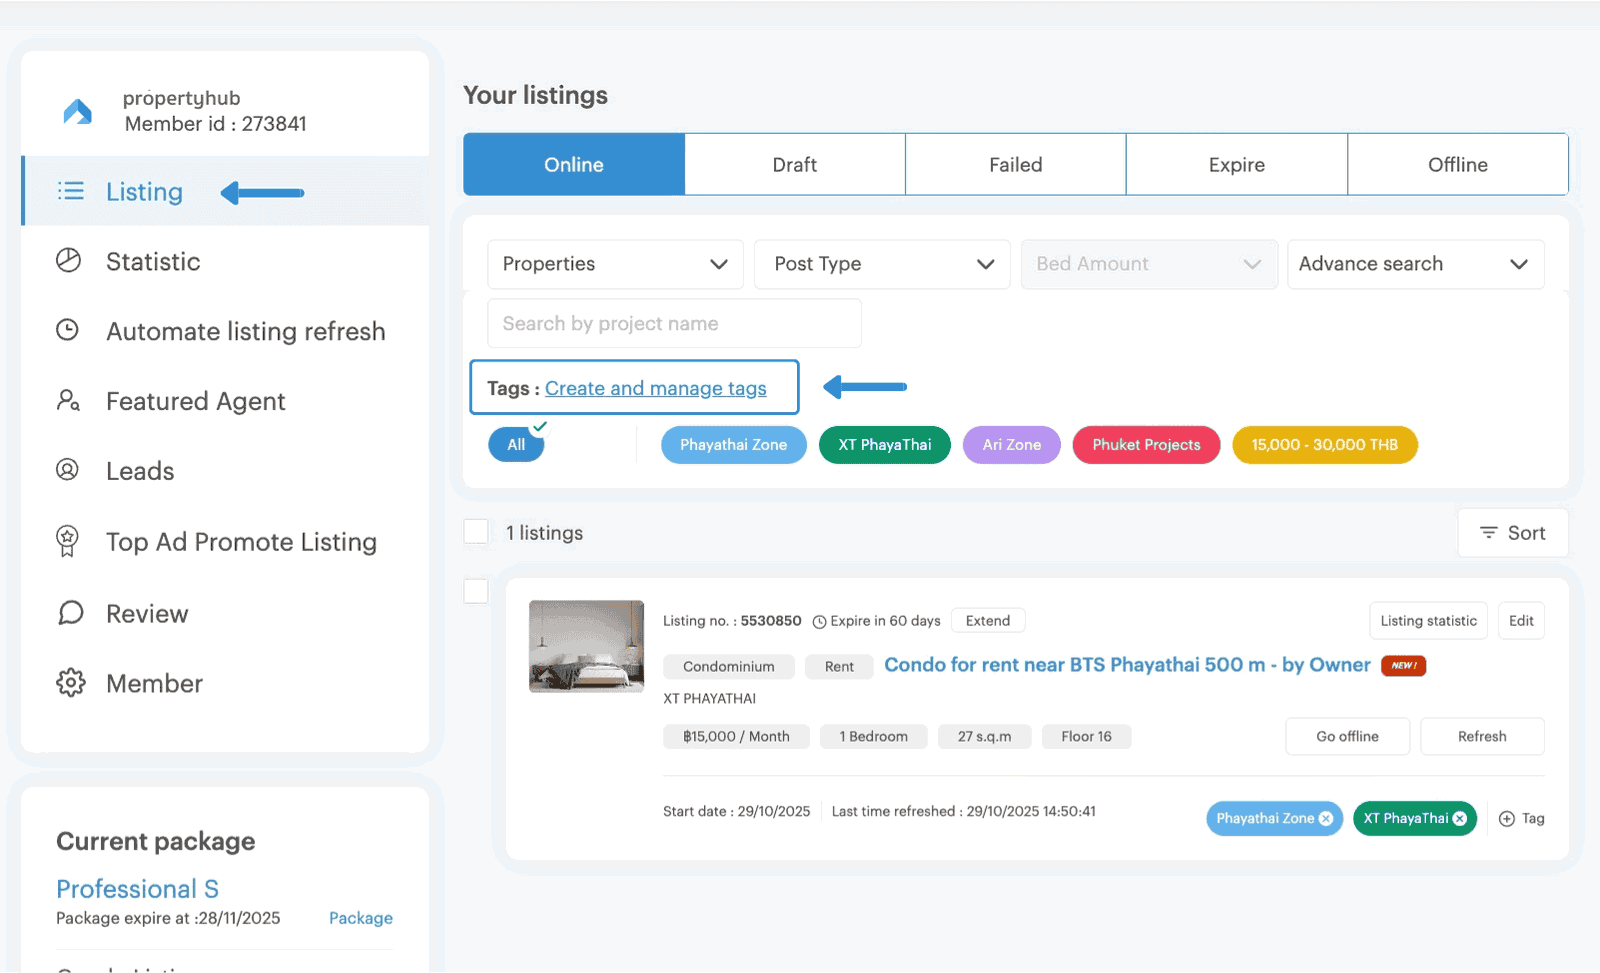
Once you click on “Create and Manage Tags,” a pop-up window will appear on your screen, allowing you to add and manage your tags (as shown in the image).
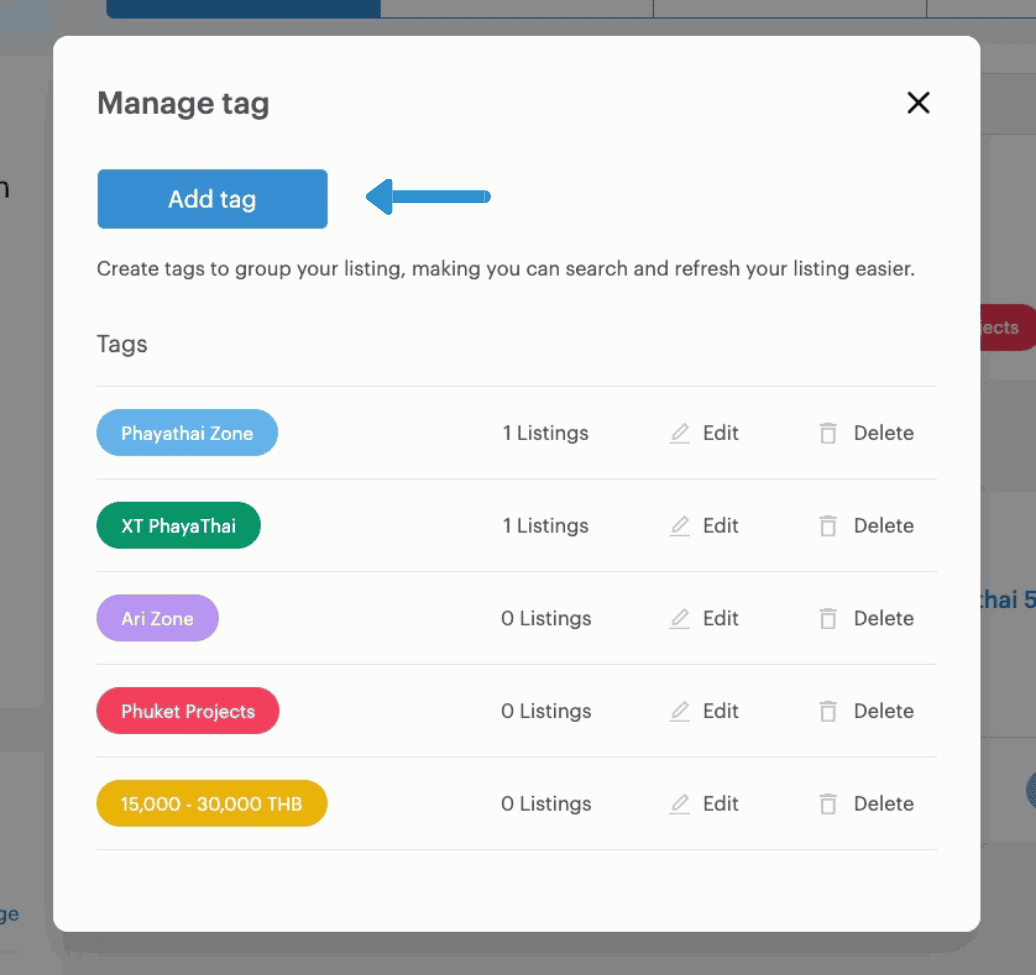
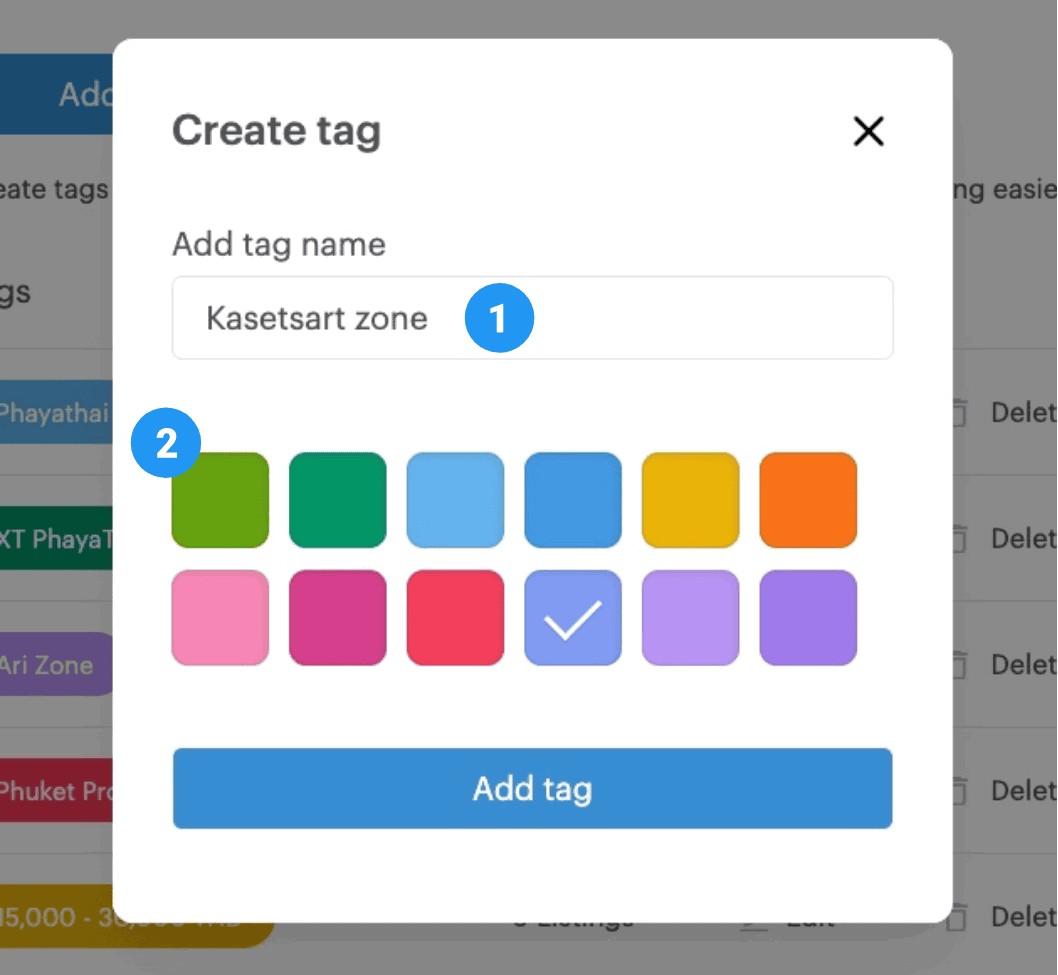
When creating a tag, you are required to specify two key details:
After creating your tags, all of them will be displayed and can be managed directly in Listings page.
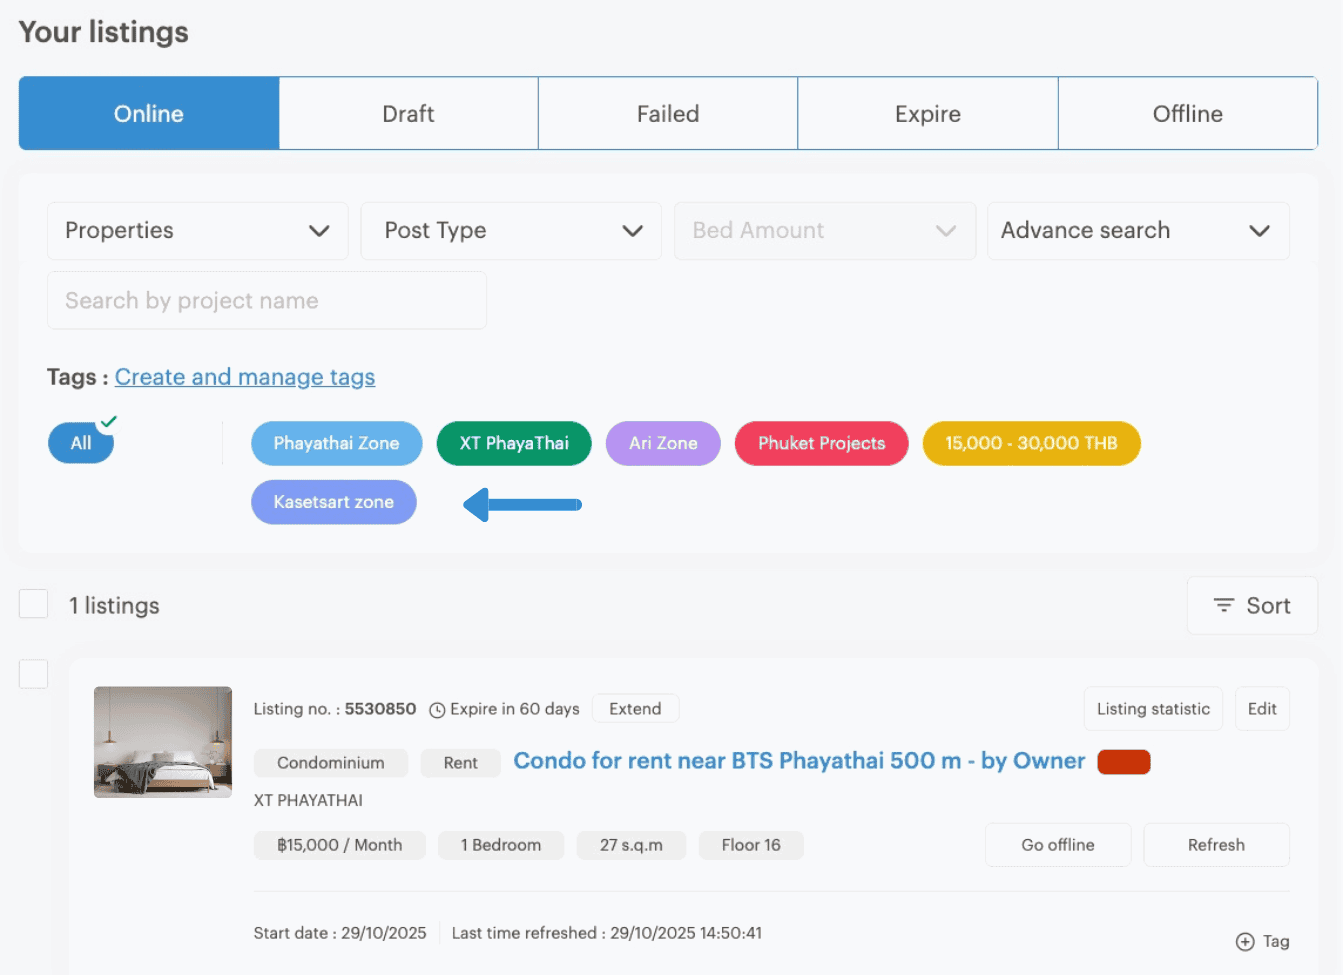
Return to the Listings Page, which contains all of your listings. Once you have created your tags following the previous steps, they will also appear here as examples (as shown in the reference image).
Let’s begin using the tags you’ve created — it’s simple and can be done in just a few steps below :
1. Tags on Single Listing
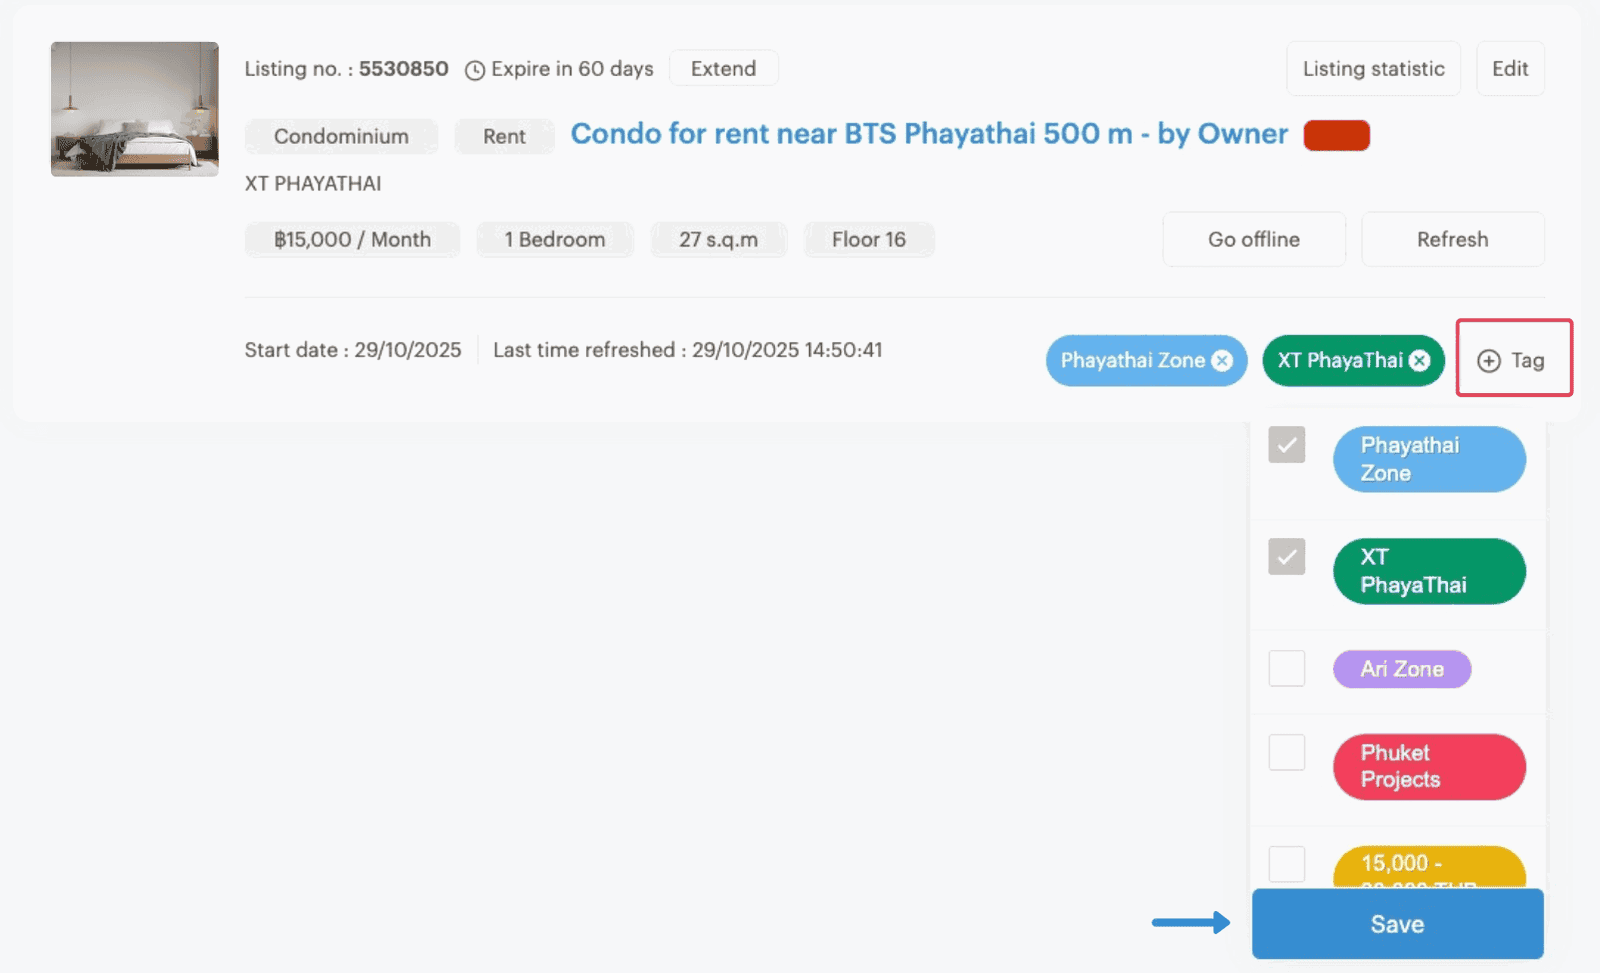
Each of your listings has a “+ Tag” button located on the right-hand side. When you click this button, your list of created tags will appear. Simply check the box in front of the desired tag(s) and click “Save” (You can select more than one tag per listing.)
2. Tags in Multiple Listings
If you want to apply tags to several listings simultaneously, you’ll need to filter the listings on your listings page to display only the ones you want to tag. You can filter by project, rental/sales type, or room type, depending on how your listings are organized.
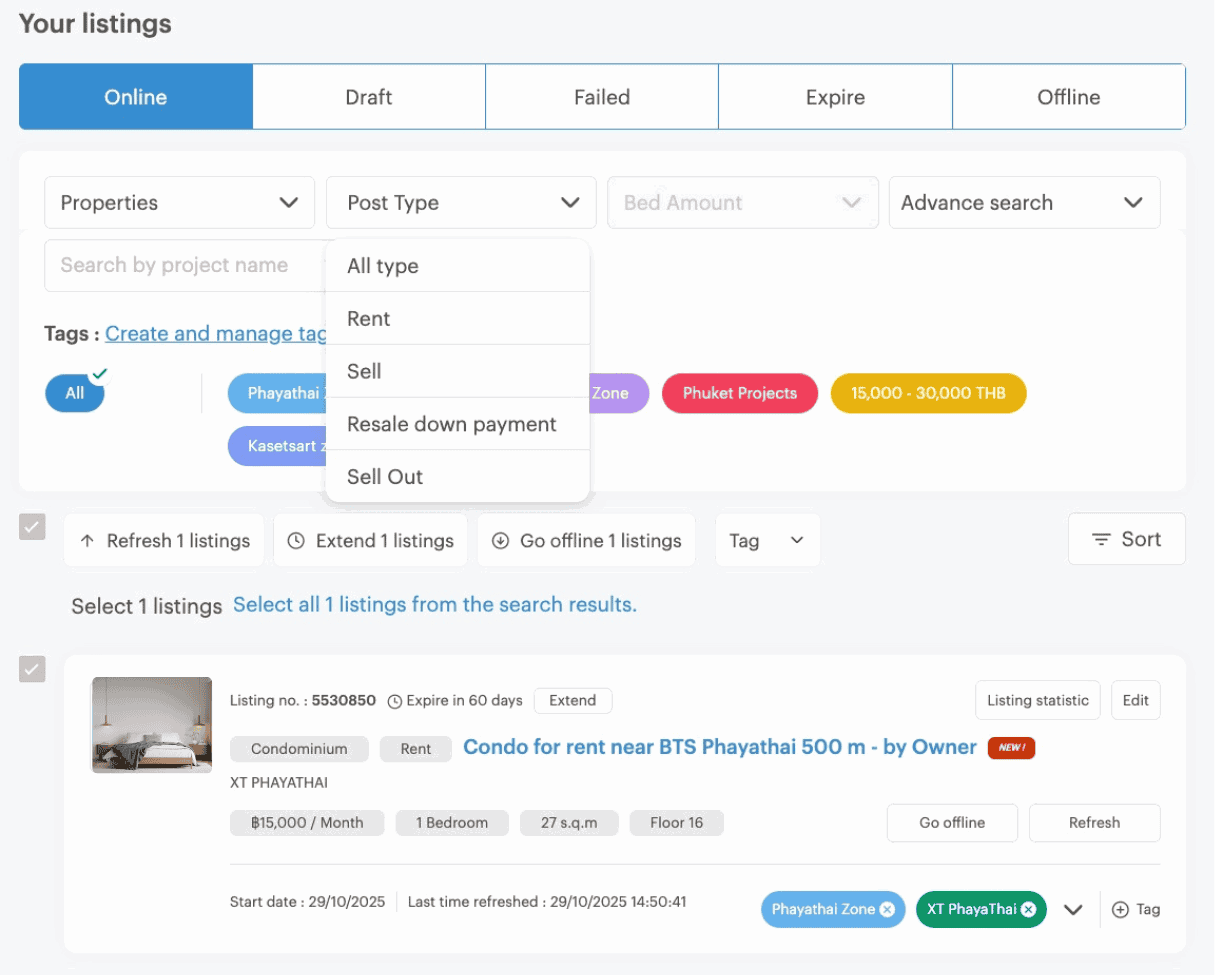
*Note: Each page can display a maximum of 20 listings. If you wish to select more listings at once, tick the box labeled “Select all xxxx listings from the search results.”
These are the simple steps to use Tags for organizing your listings, helping you manage your PropertyHub account more efficiently. We hope this feature enhances your workflow, ensuring greater accuracy and convenience. If you encounter any issues or have further questions, please contact our team via Line ID: @propertyhub or call 02-026-3049.

Yield คอนโดคืออะไร สำคัญต่อการลงทุนปล่อยเช่าอย่างไร พร้อมเกณฑ์ Yield ที่ดีควรอยู่ที่กี่เปอร์เซ็นต์ และวิธีคำนวณแบบเข้าใจง่าย สำหรับนักลงทุนมือใหม่
โพสต์เมื่อ16 June 2026
วางแผนรีโนเวทออฟฟิศให้คุ้มค่าและจบงานไม่บานปลาย! สรุปครบทุกสิ่งที่ต้องรู้ ตั้งแต่การเช็กโครงสร้าง การเลือกวัสดุ จนถึงเคล็ดลับคุมงบสำหรับมือใหม่ คลิกอ่านเลย!
โพสต์เมื่อ08 June 2026
สำหรับการขายฝากและการจำนองนั้น หากมองแบบผิวเผินแล้วเราก็เชื่อเหลือเกินว่าหลายๆ คน ยังคงแยกนิติกรรมทั้ง 2 รูปแบบนี้ไม่ออก จนทำให้เกิดความสับสนในการตัดสินใจเลือกทำนิติกรรมอย่างใดอย่างหนึ่ง เพราะฉะนั้นในบทความนี้ทางทีมงาน Propertyhub จึงจะขอนำข้อมูลรายละเอียดและความแตกต่างของการขายฝากและการจำนองมาอธิบายในรูปแบบที่เข้าใจง่าย ให้คุณได้ทำความเข้าใจกัน ซึ่งถ้าพร้อมแล้วเราไปพบกับข้อมูลที่น่าสนใจนี้พร้อมๆ กันเลย
โพสต์เมื่อ12 May 2026
สรุปข้อมูลสถิติการใช้งานเว็บไซต์ propertyhub ในไตรมาสที่ 1 (มกราคม –มีนาคม 2569) โดยข้อมูลครอบคลุมทั้งกลุ่มผู้ที่กำลังมองหาเพื่อเช่าหรือซื้อ รวมไปถึงนายหน้าที่ต้องการวิเคราะห์พฤติกรรมผู้ใช้งานและแนวโน้มความสนใจในตลาดอสังหาริมทรัพย์ โดยอ้างอิงข้อมูลจากระบบหลังบ้านและ Google Analytics
โพสต์เมื่อ10 April 2026
ในการซื้ออสังหาริมทรัพย์อย่างคอนโดนั้น นอกเหนือจากราคาขายคอนโดแล้ว สิ่งที่ต้องทราบนอกเหนือจากนี้ก็คือเรื่องของ ขั้นตอนต่างๆ ที่ผู้ซื้อทุกรายจะต้องทำความเข้าใจ เพราะไม่ว่าจะเป็นการ ซื้อคอนโด มือหนึ่งจากผู้พัฒนาโครงการ หรือการซื้อคอนโดมือสองต่อจากผู้เป็นเจ้าของก็ตาม ขั้นตอนของการ โอนคอนโด คือเรื่องที่จะสร้างความปวดหัวไม่น้อยสำหรับใครที่ไม่เคยทำความเข้าใจมาก่อน
โพสต์เมื่อ29 August 2025 ก่อนตัดสินใจซื้ออสังหาฯ")
ทางทีมงาน Propertyhub จะขอพาคุณไปรู้จักกับวิธีเช็คแนวเวนคืนที่ดิน(เบื้องต้น)ก่อนตัดสินใจซื้ออสังหาฯ ทั้งนี้ก็เพื่อป้องกันปัญหาการเวนคืนที่ดิน ที่ขอบอกได้เลยว่าไม่มีใครอยากจะเจอ
โพสต์เมื่อ08 September 2023
เช็กราคาประเมินที่ดินล่าสุดปี 2568 ครบทั้ง 77 จังหวัด ใช้ประกอบการซื้อขาย หรือวางแผนลงทุนอสังหาได้แม่นยำยิ่งขึ้น
โพสต์เมื่อ10 February 2025
support@propertyhub.in.th
support@propertyhub.in.th